
Verify that you’re using the correct carbide insert for the job:

In order to help you quickly detect if you are using the correct carbide insert for the job, we’ll assume the following:
- You won’t change your lathe Toolholder.
- You’ve already selected the geometry of the insert (80°, 55°, 35° Rhombic, Square, Triangular, Trigon, Round) cutting angle, cutting dimension and other data that makes up the nomenclature of your insert (Example CNMG 432)
The two variables that will determine the success on our carbide inserts will be:
- The grade
- The chip breaker
The correct combination on this two variables, will greatly help to achieve your production goals, be it insert performance, finish or productivity.
To determine the grade and chip break to use, you’ll need to consider 3 variables:
- A.The workpiece material.
- The main materials used are Steel, Stainless Steel, Cast Iron, Non-ferrous metals, alloys, etc. The vast majority of carbide insert brands that exist on the market have tables that recommend different grades/chip breaks of inserts based on the workpiece material. The acronyms and colors for these materials are mainly as shown in the following example table:

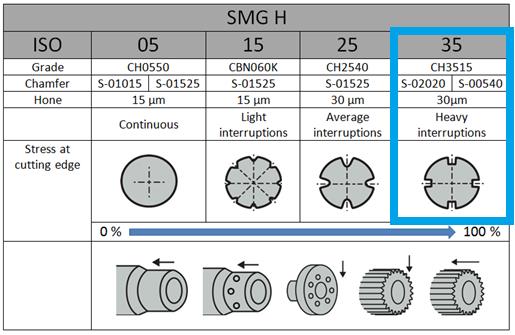
- B.If your operation is continuous, has light, average or heavy interruptions.
- Here we show the different types of operations:
- C.Type of finish you’re looking: Fine finish/High precision, light roughing, heavy roughing. Below is a table that shows how chip breakers change based on the type of finish. This can be seen in HF, HM and HR.

The combination of this 3 variables (material, type of operation and type of finish) will help us determine the grade and chip break we’ll need to use.